Print | posted on Friday, April 27, 2018 6:48 PM
Ahh, Distributed Cache, everybody’s favourite SharePoint service instance, the most reliable and trouble-free implementation since User Profile Synchronization. I jest of course, it’s the most temperamental element of the current shipping release, not to mention the most ridiculous false dependency ever introduced into the product and should be killed as soon as possible. However, it is extremely important to a SharePoint Farm in terms of both functionality and ensuring maximum performance. Even in simple deployments the impact of the Search and LogonToken related caches can provide ~20% performance and throughput improvements.
But what to do when it’s busted? Once Distributed Cache gets out of whack all bets are off and you are best throwing away the cache cluster and starting again, cleanly. This procedure has been documented by yours truly in the past. But it doesn’t help if no matter how many times you follow this procedure to the letter the service doesn’t stay up. Your Cache Hosts report “DOWN” or “UNKOWN”, and the Windows Service is either stopped, or faults immediately after starting.
This occurs often in misconfigured VMWare environments (vSphere and ESX). And it’s all down to the relationship between the guest configuration and the AppFabric configuration. As you hopefully know, SharePoint server is not supported with Dynamic Memory. Dynamic Memory is Microsoft speak for dynamically adjusting the RAM allocated to a guest. In VMWare this is actually the default configuration. The system estimates the working set for a guest based on memory usage history. Whilst the common statement is that dynamic memory will cause “issues with Distributed Cache” it’s a bit more serious than this in the real world.
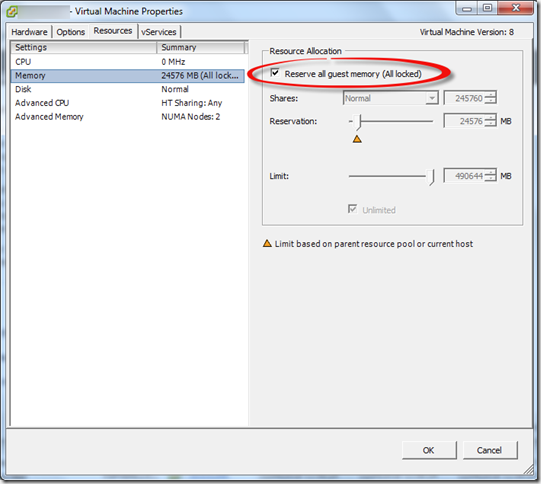
Generally speaking Guest VMs are provisioned by an infrastructure team responsible for the VM platform, and in almost all cases, the request to reserve all memory will either be not understood or ignored. This leads to the VM being configured with the defaults. If you are in control of setting up the guests then life is easy, you just ensure that the “Reserve all guest memory (All locked)” option is selected with the guest properties BEFORE you even install the SharePoint bits.

However, if you are in a situation where this was not configured originally and on that guest a SharePoint server is added to the farm and is running Distributed Cache things will go south quickly leading to a broken Distributed Cache. Even if you go back and select the option later, it’s hosed. The last machine which joins the cache cluster basically takes over. Just like with changing the service account – which resets cache size. The last one wins. Or in this case, totally hoses your farm.
One of the reasons the Distributed Cache and Dynamic Memory don’t get along, aside complete ignorance is that the Cache Cluster Configuration is not modified based on the memory resource management scheme in place (AppFabric includes this support, but it’s not exposed via the SharePoint configuration set).
The default Cache Partition Count varies for different memory resource management schemes. So, once we change that, we need to alter this configuration. If we install fresh on a new guest correctly configured it’s set automatically.
In this situation we need to deal with it ourselves, and as always there is zero (until now) documentation on this issue. This info has been used to support hundreds of customers via CSS cases over the last few years (I don’t know why it hasn’t been published properly).
Here’s the fix:
1. You need a Cache Cluster – it doesn’t need to be working (!) but if you’ve deleted all the service instances and so on, you need to bring back a broken Distributed Cache first.
2. Use the following PowerShell to export the Cache Config to a file on disk
Use-CacheCluster
Export-CacheClusterConfig c:\distCacheConfig.xml
3. Edit the XML file so that the partitionCount is 32:
<caches partitionCount="32">
4. Save the XML file
5. Use the following PowerShell to ensure the Cache Cluster is stopped and import the modified configuration, and then Start the Cache Cluster (this time it will actually start!)
Stop-CacheCluster
# should report all hosts down

Import-CacheClusterConfig C:\distCacheConfig.xml
Start-CacheCluster
6. Once you’ve done this you can use the standard tooling to report on the cluster or use my PowerShell module, each host in the cluster will report “UP” and you can interrogate the individual caches to verify they are being populated. You will of course need to modify your cache size if you have changed it previously, or wish to. Do it now before it starts being used!
Happy days!
s.