Print | posted on Wednesday, February 13, 2013 1:34 AM
One of the most common requests I get is for an update to my article SharePoint Central Administration: High Availability, Load Balancing, Security & General Recommendations to cover SharePoint 2010 and 2013. Most folks are interested in the SSL parts, which has changed a little bit mainly due to the introduction of Windows PowerShell management in SharePoint 2010.
This reasonably short post will walkthrough the configuration steps necessary. It’s all very straightforward, however there are a couple of critical considerations which I will point out as we go through the steps.
Updated 14/02/2013 to include Windows PowerShell for configuring the IIS bindings with a certificate.
Why run Central Administration on SSL?
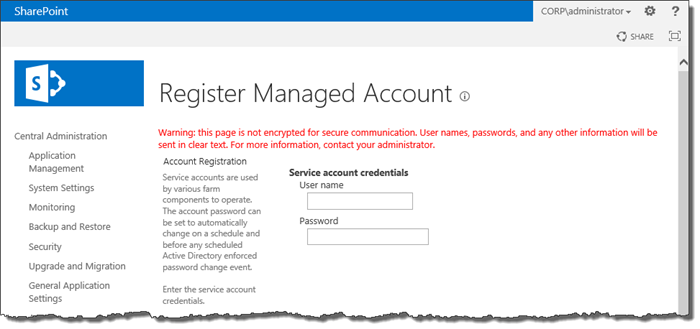
Fundamentally it’s to protect credentials. In numerous places in Central Administration we are asked for the credentials of an account and these will be passed back to the server in plain text in a regular installation. CA will actually warn us about that if we can be bothered to read the red warning text in the pages which ask for credentials:

In order to protect the credentials we need to implement some form of Transport Layer Security, and Secure Sockets Layer (SSL) is the most appropriate approach.
Running CA over SSL should definitely be considered a “best practice” and it’s very easy to implement. However the large majority of SharePoint deployments will not bother and the documentation here is non existent (until now).
Configuring the Port used by Central Administration
SSL basically means port 443. We can choose to use another port but it’s a very bad idea to use non default ports so I am not going to cover that in this article, and you shouldn’t be doing it either!
Therefore the first step is to change the port used by CA. When we initially create the farm using PSConfig(UI).exe we are provided with a randomly generated “high port” or we can choose one of our liking. If we are planning ahead we can simply enter 443 in PSConfig(UI).exe:

Similarly if we use Windows PowerShell to create the farm we can specify a port with the New-SPCentralAdministration cmdlet.
New-SPCentralAdministration -Port 443 -WindowsAuthProvider NTLM
Both of these approaches will appear to work just fine, however the result will be that the CA web site in IIS will be stopped. Although we used port 443, the binding used is http! Because there is no host header on this site, and the default web site also has no host header, the CA web site cannot start. Bottom line here, is that PSConfig and New-SPCentralAdministration haven’t been implemented very well from this perspective and simply don’t understand SSL! Ooops!
Therefore a better approach is to create CA using a “high port” and then enable SSL afterwards. We can use port 443 if we wish but we will still have to do the following steps to fix up the binding so that it is https rather than http.
In this example we have originally used port 8080, and we now want to make CA use SSL, so we need to change the port to be 443.
It’s a trivial operation using the Set-SPCentralAdministration cmdlet. Note that we cannot make this change using Central Administration itself so Windows PowerShell is our only option.
Set-SPCentralAdministration -Port 443
In the past we used STSADM to set the port used by CA:
stsadm -o setadminport -port 443 -ssl
In fact we can still use this legacy approach, but we probably shouldn’t as it’s not clear how much longer this guy will be around (hopefully not long!). So we should consider Set-SPCentralAdministration as a direct replacement for the STSADM setadminport operation. However, note that Set-SPCentralAdministration does not include a –ssl switch and there is no means of telling SharePoint that this is a SSL site like there is when creating other web apps (-SecureSocketsLayer).
The good news is that this does NOT present a problem as the Set-SPCentralAdministration cmdlet is smart enough to know that 443 is the port for SSL and will configure the binding correctly in IIS:

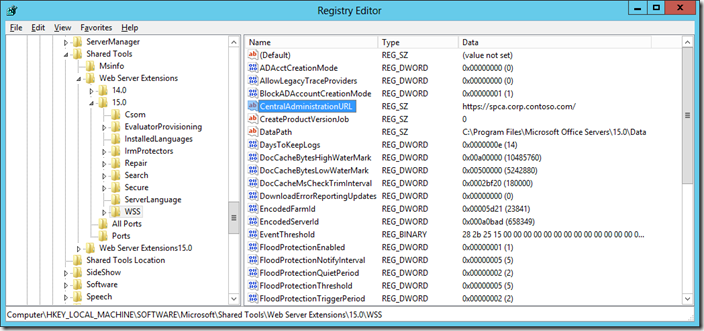
Similarly, this cmdlet will update the Central Administration URL in the registry so that the shortcut uses the correct URL (https://servername) without a port.

In short this means we don’t have to care about explicitly telling SharePoint this is an SSL site and we don’t need to run STSADM (for this at least).
At this stage – no matter how we got here (using 443 originally or changing to it afterwards) – the CA site will be inaccessible until we obtain an SSL certificate and further configure bindings in IIS. IIS cannot respond to HTTPS requests unless there is a certificate configured in the bindings of that web site.
Obtaining an SSL Certificate
Before we can use CA over SSL we will need an SSL Certificate. Before we obtain one we should make a decision on how we wish to address CA. In other words, which DNS name we want to use. This is important as in order to avoid certificate warnings, the DNS name used should match the Common Name (cn) used on the certificate.
By default, CA will be running on a single server in the farm, usually the first server in the farm. In that case the address for CA can be a machine name. However if we later move CA to another server, or wish to run CA on more than one machine this address won’t work, and neither will our certificate.
Thus it is sensible to choose a “fully qualified name”, for example spca.corp.contoso.com. That address can then be used throughout the lifecycle of the farm no matter which machine runs CA, or how many. We must also ensure that this address exists in DNS and points to the correct IP address, either an individual server or the virtual IP address of a load balancer. In this example our CA name will be spca.corp.contoso.com and a DNS record points to 10.0.0.50, the address of our server running CA.
Now we have the addressing sorted out, we can go ahead and obtain an SSL certificate. There are a number of options here, and the right choice will always be environment specific.
We can use self signed certificates, which are often considered the easiest. However these certificates will not be trusted and will therefore present warnings when accessing CA.
We could also choose a “real” certificate from a public authority. These cost money and involve paperwork. Not cool!
Another, and perhaps the best, option is to use a certificate from a Domain Certificate Authority should one exist in the environment where our SharePoint farm is at. This of course is a wider conversation that just central administration, but there are numerous advantages of having one of these for SharePoint 2013. I will cover wider SSL considerations for SharePoint in a future post.
For this example we will use an existing Certificate Authority in the domain.
On a machine running CA, we will open up Internet Services Manager and select the computer node in the Connections pane. Then double click the Server Certificates icon in the Features view:

From the Actions pane, click Create Domain Certificate…

On the Distinguished Name Properties page of the Create Certificate dialog, enter the Common Name (which matches the address we decided upon earlier). This is the only value that really matters, we can enter any old values for the others. Click Next.

On the Online Certification Authority page, click the Select button, and then select the Certificate Authority followed by OK. The CAs available in the domain will be automatically displayed.

On the Online Certification Authority page, enter a Friendly name for the certificate. Again this isn’t actually that important, but a good practice is to use the common name, or something else meaningful (e.g. SPCA). Click Finish.

After a few moments the certificate will be issued for us by the CA and will be displayed in IIS. We can double click it to view the certificate.

Now we have a certificate in IIS we can configure the bindings of the IIS Web Site which hosts Central Administration.
Configuring IIS bindings for the CA Web Site
SharePoint is ignorant of SSL settings in IIS so we need to configure these manually. Whilst it is possible to do this via IIS Windows PowerShell cmdlets, SSL bindings are a little complicated so we will first use Internet Services Manager for this example. Afterwards we will look at the Windows PowerShell to achieve the same end result.
Click the Sites folder in the Connections pane and double click on the Web Site, SharePoint Central Administration v4.

In the Actions pane, click Bindings…

In the Site Bindings dialog, select the https binding and click Edit…

In the Edit Site Binding dialog, enter spca.corp.contoso.com as the Host name, check the Require Server Name Indication check box, and select the spca.corp.contoso.com in the SSL Certificate combo box. These settings will be explained in a moment. Click OK followed by Close.

We have now completed the IIS configuration, and we can go ahead and test we can access CA from a browser by navigating to https://spca.corp.contoso.com. If we navigate to one of the pages that accepts credentials (e.g. Register Managed Accounts) the red warning text will not be displayed.

Let’s take a moment to talk about the SSL binding settings we used.
Firstly the Host name (aka Host Header). This isn’t strictly required at this point, as CA is the only SSL Web Application in our farm. However as such it will prevent the creation of any new SSL Web Applications on port 443. Just like with “regular” web apps, SharePoint does a very bad job of dealing with IIS settings. In order to create future web apps using SSL via CA or Windows PowerShell we will need to use the –HostHeader option.
There is nothing we can do about this other than live with it as when creating CA we cannot specify a host header. Unless we resort to using an IP address for each web app, we must use host headers in the same way we do for web apps on port 80.
Next is Server Name Indication (SNI) aka Server Name Identification. For a long time it was the case that it was impossible to have multiple SSL web sites using different certificates on the same IP Address/Port. Therefore a wildcard certificate would be needed. SNI is an extension to SSL implemented in recent versions of IIS which allows the server to present multiple certificates on the same IP Address/Port. We don’t strictly need to check this box but again if we add additional web apps using SSL to this farm in the future it will likely be needed. I will be covering SSL web apps with SharePoint 2013 in much more depth in a future article. For now however, be aware that this setting requires a compatible browser as well as the web server. Recent versions of all the main web browsers support SNI.
The SSL Certificate setting is fairly obvious, we simply select the certificate we obtained in the earlier step. If all we want is CA on SSL and we don’t care about other SSL web apps, then this is the only setting needed.
We can also perform the exact same configuration using Windows PowerShell. IIS bindings are a snap thanks to the *.WebBinding cmdlets, however working with and applying certificates is a little more tricky. It’s not a huge stretch once you are familiar with the IIS:\ provider and the syntax of various binding properties, but it does take a bit of getting used to.
Import-Module WebAdministration

# Name of Web Site in IIS we want to modify the bindings for
$iisSiteName = "SharePoint Central Administration v4"

# Host header
$iisHostHeader = "spca.corp.contoso.com"

# Friendly Name of certificate
$certName = $iisHostHeader

# Remove the existing binding as we cannot update SSLFlags for an existing binging via PoSH
Get-WebBinding -Name $iisSiteName | Remove-WebBinding

# Create new binding with correct SSLFlags, 1 == SNI
New-WebBinding -Name $iisSiteName -HostHeader $iisHostHeader -Protocol "https" -Port 443 -SslFlags 1

# Grab the Certificate
$cert = Get-ChildItem -Path "Cert:\LocalMachine\My" | where-Object {$_.FriendlyName -like $certName}

# Update the binding with the certificate
$cert | New-Item -Path "IIS:\SslBindings\!443!$iisHostHeader"
We first set up some variables for later use, we need the name of the Web Site in IIS, along with the Host Header and the friendly name of our certificate. Now it should be clear why it’s a good idea to use the same name for both!
We then remove the existing binding as the Set-WebBinding cmdlet doesn't allow us to modify the SslFlags directly and create another one using the Host Header and the important SslFlags value of 1, which means SNI. More on the various options here in a future post.
Now we have a binding we need to attach the certificate to it. This is where it gets a little weird as we need to leverage the IIS:\ and Cert:\ providers.
First we grab the certificate by retrieving it from the local store via the Cert:\ provider by means of it’s Friendly name.
We pipe the certificate into a new item using the IIS:\ provider. The path we pass in here is constructed based upon the IP Address, the Port and the Host Header. We leave the IP Address empty because in this example we are using All Unassigned.
The syntax of this path in particular is where most problems arise when working with certificates in IIS via Windows PowerShell, I will be covering this in more depth in a future post. For now the above is all we need to know!
The final step will produce an orange warning in the output, suggesting that our host header and certificate subject don’t match. That’s OK, we can safely ignore the warning as our common name is correct and what really matters here.
You may see on the ‘net lots of examples that use the certificate thumbprint to do these last two steps, like below.
# Grab the Certificate thumbprint
$certThumb = Get-ChildItem -Path "Cert:\LocalMachine\My" | where-Object {$_.FriendlyName -like $certName} | Select-Object -ExpandProperty Thumbprint

# Grab the Certificate and update the binding
Get-Item -Path "cert:\localmachine\my\$certThumb" | New-Item -Path "IIS:\SslBindings\!443!$iisHostHeader"
This approach will work just fine but includes a redundancy as it retrieves the certificate twice. It is not necessary to do this.
Configuring the Internal URL for Central Administration
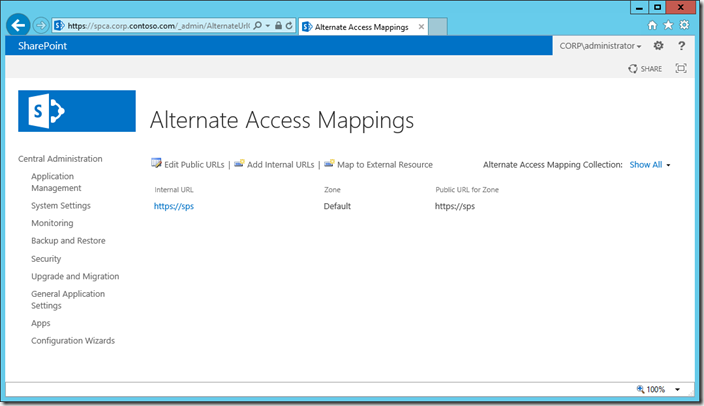
At this point the URL for CA stored in the registry and used by the CA shortcut and the Internal URL have not been updated. In this example they remain https://sps:

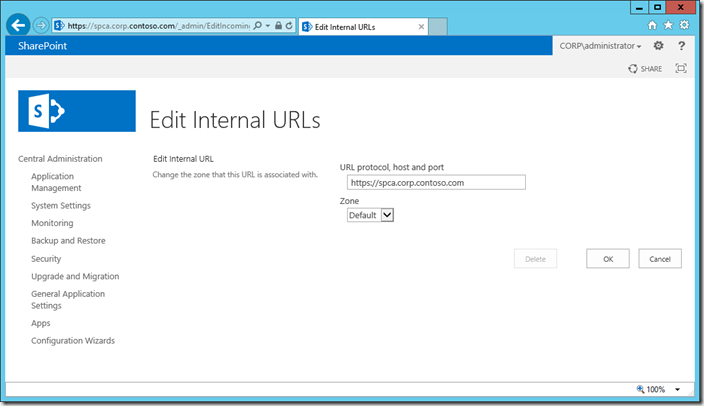
In order to update the registry key and internal URL, we simply update the Internal URL to be the one we desire (https://spca.corp.contoso.com/).
Central Administration –> System Settings –> Alternate Access Mappings
Click the existing Internal URL, edit it and click OK.

Or by using the following Windows PowerShell:
Set-SPAlternateURL -Identity "https://sps" -Url "https://spca.corp.contoso.com"
Now our CA shortcut will open the correct URL, as the value is updated in the registry.

Conclusion
That’s it. It’s actually very simple stuff. We effectively perform four steps:
- Configure the port used for Central Administration
- Obtain an SSL Certificate
- Configure IIS bindings for the Central Administration Web Site
- Configure the Internal URL for Central Administration
Simple enough to mean that everybody should be using SSL for CA!
Like most things SharePoint however there are a couple of key planning considerations. Addressing CA, i.e. the name used to access CA and whether or not we will have more SSL web apps in the future. We should also decide which type of certificate we will use and where to obtain it from.
s.