Print | posted on Friday, April 23, 2010 7:47 PM
Introduction
There's a ton of stuff out there on User Profile Sync in SharePoint Server 2010. Some of it’s good, some of it’s frankly terrible. TechNet has some of the best material, but unfortunately TechNet’s format restrictions are counter-intuitive. Therefore this article presents an end to end, “rational guide” to setting this up.
[UPDATE: 01/10/2010] TechNet has recently updated its Configure profile synchronization (SharePoint Server 2010) topic, which is greatly improved and now a first class resource. I urge you to check this out.
There are a couple of contentious setup requirements in here. I may discuss those in more depth later. For now, the following steps are required. Don’t try and work around them, UPS will break. The following is the least privilege you can get away with.
You should really read the Architecture Overview below to become acquainted with the moving parts involved, but if you are impatient, you can skip to the procedure itself.
If you are having problems, firstly ensure you are following the steps below exactly. I have a follow up article which also details the most common problems with configuring profile synchronization, which may help. “Stuck on Starting”: Common Issues with SharePoint Server 2010 User Profile Synchronization
Architecture Overview
The following logical component diagram provides an overview of the different elements that together deliver the profile synchronisation capability.
[UPDATE 11/09/2010] a new, corrected version of the diagram.
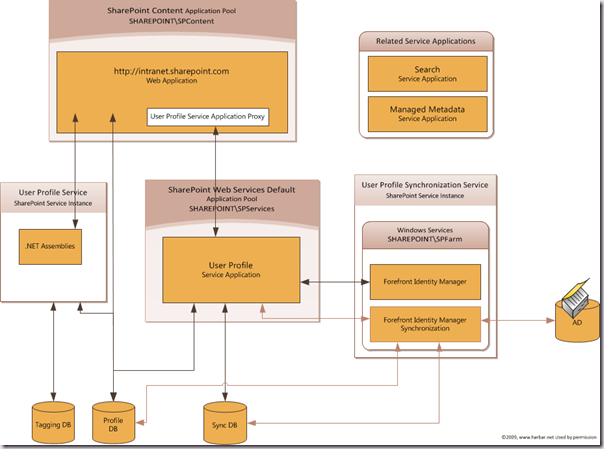
Click above to view at full size.
The key components are briefly described below.
User Profile Service Application
Note: A SharePoint Service Application is a logical / conceptual object which is currently very badly articulated. I will be covering service applications in more detail in a future article. The relevant physical assets are described in this article.
An IIS Application which sits in the SharePoint Web Services IIS Web Site. The IIS Web Site is on every machine in the farm. When we start the Service Machine Instance later, the IIS Application will be created. It will be named with a GUID and is hosted by an Application Pool (which is also named with a GUID!). It hosts a couple of WCF services (profileproperty and profiledbcache). This is known as a Service Application Endpoint.

The Service Application Endpoint has three associated back end databases and other configuration. Pages for managing the Service Application are hosted in Central Administration and are called using a GUID in the query string. The WCFs don’t actually do any work themselves but provide an interface to calling clients and calls other elements of the system.
There can be more than one instance of the User Profile Service Application, but there is a one to one mapping between a Service Application and the User Profile Synchronization Service Service Machine Instance or “SharePoint Service”.
Note: The concept of a Service Machine Instance or “SharePoint Service” (i.e. the items in Services on Server) is very badly articulated in general and the name of course is deeply confusing.
There is also a Service Connection (aka Proxy). This lives within the SharePoint Foundation Web Application Service and allows Service Consumers (Web Applications) to call the Service Application.
User Profile Service
A “SharePoint Service” in Services on Server. This is not a Windows Service, but some .NET assemblies that do some work with profiles and other elements which are not to do with Synchronising of properties. There are no configuration options. This should run on the machine in the farm you wish to use to host the User Profiles “Role”. When it’s running that machine is known as the Service Machine Instance.

User Profile Synchronization Service
A “SharePoint Service” in Services on Server. This is a wrapper responsible for the provisioning of the Forefront Identity Manager (FIM) bits. You select a UPS SA to associate with, and need to specify the credentials under which the FIM Services will run. This should run on the machine in the farm you wish to use to host the User Profiles “Role”. When it’s running that machine is known as the Service Machine Instance.

Forefront Identity Manager
A bundled version of FIM that includes two Windows Services, and associated configuration and data. It is not supported to use the FIM client tool but this can be useful for viewing progress and identifying errors. The two FIM services are configured by the User Profile Synchronization Service SharePoint Service (rolls off the tongue doesn’t it!).
The FIM Client is located at C:\Program Files\Microsoft Office Servers\14.0\Synchronization Service\UIShell\miisclient.exe

Note: For some “social” SharePoint features we require Search and Managed Metadata Service Applications setup – more on that later.
Example Scenario
For the purposes of this article we have a very simple example scenario. We have two Web Applications (intranet.sharepoint.com & my.sharepoint.com). The Intranet application will host our corporate published content and the My application will host My Sites.
There is other configuration required and in some cases additional permissions required for complex domain environments. However for the scope of this article everything here is all you need.
Preparing the Platform
Before we can administer User Profile Synchronization we must create and configure elements of the supporting infrastructure and SharePoint. We are *not* going to use the Farm Configuration Wizard (FCW). The FCW is useful when standing up demo environments and for simple single server solutions, but it is entirely inappropriate for farm deployments and takes a number of shortcuts to provision a basic setup. We are going to “do it properly” in the same way any real farm deployment would be done.
It is assumed that you have installed SharePoint Server 2010 in Complete mode, and have run the SharePoint Configuration Wizard (SCW) to create a new Farm using DOMAIN\spfarm for the Farm Account. DOMAIN\spfarm is not a domain or machine administrator at this point. Furthermore, once the SCW has completed, you have not run the Farm Configuration Wizard or made any other changes in Central Administration. It is also further assumed that you are not logging onto the server using the Farm Admin account or using it to access central admin!
[UPDATE: 01/11/2010] Also, I assume that you have not used a Fully Qualified Domain Name or IP Address when specifying the SQL Server when running the SharePoint Configuration Wizard (PSConfig). Using either is strongly discouraged, and will lead to failures with the provisioning of the User Profile Synchronization service instance. Stick to a NetBIOS name, or a SQL Server Alias.
The order of setting all this up is important, if you do things in the wrong order it will break and you basically need to start over again unless you enjoy tidying up broken apps and ensuring the File system, registry, config db etc is in a good shape.
[UPDATE: 01/11/2010] While it is not required to get things working, I strongly recommend that you deploy the June or August Cumulative Updates (CU). Preferably the August CU, which offers a much easier installation. These contain numerous fixes related to User Profile Synchronization. Install these preferably before creating your Farm using PSConfig. The August CUs are available at:
- KB 2352346 - SharePoint Foundation 2010
- KB 2352342 - SharePoint Server 2010
Create and Configure Accounts and Permissions
The first step is to create some Active Directory accounts which will use as service account identities for Windows Services and SharePoint Application Pools. On a Windows 2008 R2 Domain I recommend creating these accounts within the built in “Managed Service Accounts” Organisational Unit but you need to understand the implication of placing them there. If you don’t, create a new OU called Service Accounts. Create each of these accounts as normal Users and choose the expiry options (never expire, user can’t change password).
- DOMAIN\spcontent
- DOMAIN\spservices
- DOMAIN\spups

We need to grant the Replicating Directory Changes permission on the domain to the DOMAIN\spups account. This account will be used to perform the sync, it will not run any services or application pools.
- Right Click the Domain, choose Delegate Control… click Next
- Add the DOMAIN\spups account, click Next
- Select Create a Custom Task to Delegate, click Next
- Click Next
- Select the Replicating Directory Changes permission and click Next
- Click Finish
We also need to grant replicating directory changes on the Configuration Naming Context for the domain.
[UPDATE 11/09/2010] this is only required if the NetBIOS name of the Domain is different from the fully qualified name (FQDN). In which case you also need to configure the Service Application (after creation, details in a later step).
- ADSIEdit.msc
- Connect to the Configuration Partition

- Right click the configuration partition and choose properties
- From the Security tab, add the DOMAIN\spups user and give it Replicating Directory Changes permissions

Note: this is not required if you are running SharePoint on a Domain Controller, but you shouldn’t be so don’t! :)
If our Domain Controller is running Windows 2003 or earlier functional level we also need to make the DOMAIN\spups account a member of the Pre Windows 2000 Compatible access built in group.
The DOMAIN\SPFARM account requires the log on locally right on the machine running the User Profile Synchronization (FIMSync) service. Grant this right via Group Policy or Local Security Policy on that Machine.
- Security Settings - > Local Policies -> User Rights Assignment -> Allow Logon Locally
- If on a DC ( you shouldn’t be :)) GPMC.MSC and edit the default domain controller policy
- Run gpupdate to refresh the policy change
To provision the UPS service – we must make the DOMAIN\spfarm account a local administrator of the box hosting the UPS service. Once we are done we can remove this. Don’t try and work around this – you won’t succeed! The local administrator rights are only required during provisioning.
[Update] Please note that any event in your farm that requires the UPS service instance to be provisioned will require the Farm Account be a local admin. Such events include the re provisioning of the service instance following the deployment of a SharePoint Cumulative Update and performing a Farm Backup from Central Administration (which stops and starts the UPS service instance). Don’t forget to ensure that the correct rights are assigned (and actually taking effect) when planning and scheduling your farm operational maintenance tasks.
[Update] Changing the rights of a user account requires that account log off and log back on before the changes are applied. As the farm account is running services, you should restart the SPTimerV4 service, or better yet REBOOT THE MACHINE you wish to host UPS on now. If you don't, you will likely run into a stuck "starting" state when you provision the User Profile Synchronization Service Instance later on. More details at SharePoint 2010 User Profile Sync & Reboots.
Create SharePoint Managed Accounts and Web Applications
Register the following accounts as managed accounts in SharePoint Central Admin, Security, Configure Managed Accounts:
- DOMAIN\spcontent
- DOMAIN\spservices
There is no point making the DOMAIN\spups account managed as the UPS can’t handle managed accounts.
Create two new Web Applications (my.sharepoint.com & intranet.sharepoint.com)
When creating the first one, also create a Application Pool named SharePoint Content using the DOMAIN\spcontent Managed Account. When creating the second one, select the existing application pool (SharePoint Content).
Note: of course you can use whatever you want here based on your logical architecture design, this is just the cleanest way. Don’t be hosting mysites on the same app as your main content app!
In the my.sharepoint.com web application create a site collection using the My Site Host template. We could also enable self service site creation at this stage, but this is not required. If you go to the mysite web app you will get an error stating the User Profile Service is not available. This is the expected behaviour at this point
Don’t bother with a site collection for intranet.sharepoint.com now unless you really want to!
Create the UPS Service Application
- Application Management, Manage service applications
- From the Ribbon, click New, followed by User Profile Service Application
- Give it a sensible name
- Create a new App Pool (SharePoint Web Services Default) and use the DOMAIN\SPServices managed account
- Accept the defaults for the three Databases
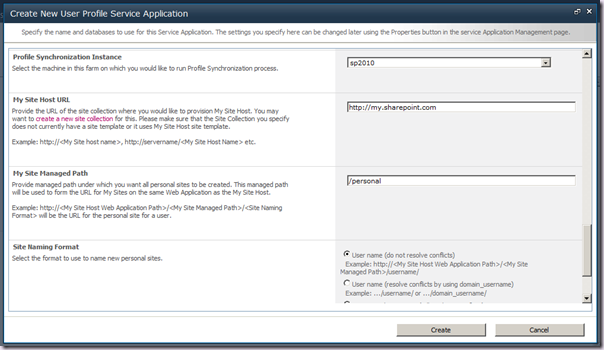
- Select the machine in the farm running FIM (well it’s not running yet but this UI is crap it just lists servers in the farm)
- Enter the URL of the mysite host (http://my.sharepoint.com) amazingly this step actually validates the target site collection!
- Select your managed path and site naming scheme.
- Click Create, and wait while the Service Application, Service Connection and Databases are created.
[UPDATE 11/09/2010] if the NetBIOS name of the name is different from the fully qualified name (FQDN) you will also need to configure the Service Application to support this. To enable the Service Application to support NetBIOS name resolution, run the following Windows PowerShell:
$upsa = Get-SPServiceApplication –Id <GUID of User Profile Service Application> $upsa.NetBIOSDomainNamesEnabled=1 $upsa.Update() # To get the GUID of the User Profile Service Application run Get-SPServiceApplication.
Start the UPS related SharePoint Services
- System Settings, Manage Services on server
- Select the machine in the farm you wish to run this stuff on
- Start the User Profile Service (no options)
- Start the User Profile Sync Service
- Select the Service App you created in the previous section
- Enter the Farm Account password (lamer I know, UPS doesn’t understand managed accounts) and click OK.

- Wait
- Wait :)
- Whilst the screen returns immediately the status for the UPS Service will show starting for a while.
- It’s provisioning the FIM services and a bunch of other stuff – coffee is an option, it will take around 10 minutes on a VM. Be patient! My baseline time is 240 seconds.
- An IIS Reset is required if central admin is on the same box as FIM.
An IIS reset is always a good choice here even if it isn’t :).
If you are impatient, an IISReset will ensure that provisioning kicks in immediately, but once it’s complete you will need to run IISReset again before you can manage the User Profile Service Application.
- Once it’s sorted you can see in services.msc that the two FIM services are running as the farm account, you can run MIISclient and it will connect etc.
- Remove the Farm account from local administrators on the box running FIM
- Depending upon your machine/farm configuration you will also need to enable inbound network connections to MSDTC on the machine hosting FIM. This step is only needed if you are running a named instance of SQL Server.
Note: If this step is not successful, DO NOT attempt to configure things manually using Services.msc. You will miss things that are required. You should reboot the machine and run the UPS Provisioning Timer Job (ProfileSynchronizationSetupJob). If the job cannot be found, you should repeat the above procedure.
Configure Connections and do a Sync (Import)
- Application Management, Manage Service Applications
- Click to the right of the UPS Service App and then the Manage button on the Ribbon
- In the Synchronization section, click Configure Synchronization Connections
- Click Create New Connection
- Give the connection a name
- Select the Type (Active Directory)
- Enter the Forest Name (for simple scenarios this will be the same as your domain name)
- Choose Windows Authentication
- Enter the DOMAIN\spups account credentials for the connection
(this is the important bit – this guy is what FIM will use to connect – hence the replicating permissions)
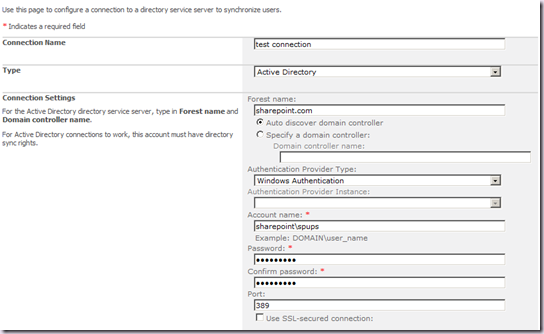
- Hit the Populate button, and this will test the credentials entered and show a Container Hierarchy tree view.
- Don’t select the DOMAIN! :) select a OU! This is the OU from which you want to import/sync. This UI isn't exactly scalable, but it’s what it is.
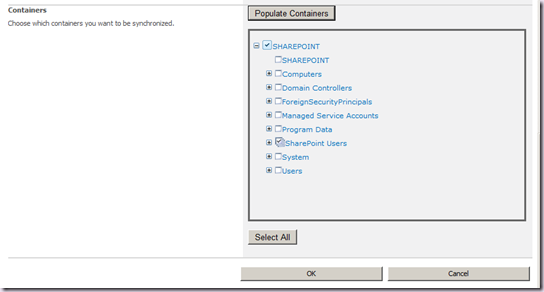
- See that Select All button? Don’t ever click that bad boy. It’s way too close to the OK button!
- Save the connection by clicking OK. Your connection will be saved and you will be returned to the manage connections page.
- Navigate back to Manage Profile Service
- In the Synchronization Section click Start Profile Synchronization
- On the Start Profile Synchronization page, click OK.
- Refresh the Manage Profile Service Page, you will see the progress on the right hand side.
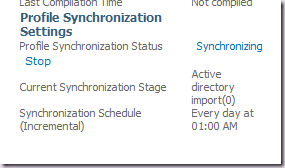
- It is slooooooooooooooooooooooooooooooooooow!
- Click the details link to see some kick ass CSS work in a pop up dialog. This and the Manage Profile Service page DO NOT automatically refresh. You can also see some more GUID love from the SharePoint engineering teams in this UI.
- You can also see progress by running miisclient.exe
- Note that sync has stages, MIIS will report its complete, but SharePoint still has work to do. Be patient! Even for a import there are eight stages, each of which will be reported in the pop up dialog.
- Once it’s complete you will see your imported profiles in the Profiles status on the top right and also in the Manage User Profiles page.

If you get sync errors it’s almost certainly replicating directory permissions. 8453 means you haven’t set that properly or you’ve done it on the wrong account. There is NO other reason for this error! If you didn’t set it and your domain admin tells you it’s done, ask for a screenshot.
Nice, so what about actually writing back to AD (Sync)?
If you got here you are probably pretty happy. But a bit narked! All we’ve done thus far is to do the same thing we could do with SharePoint 2007 (and SharePoint 2003) – i.e. do a profile import.
To do a Sync you need additional permissions for the DOMAIN\spups account. You must grant the account Create Child Objects on the OU you are Syncing with.
Do this via ADSIEdit.msc by connecting this time to the default naming context of your domain, selecting properties on the OU you are syncing with, and adding the Create Child Objects and Write permissions to the DOMAIN\spups account.
Note we can also do this with ADUC by selecting Advanced Features from the View menu.
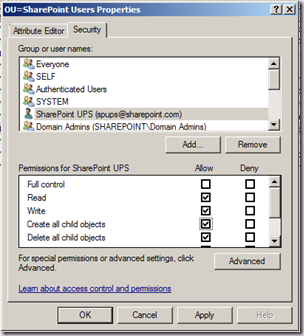
Now, you need to be a little careful here. As you can see above the DOMAIN\spups account is already in the properties (that’s because we added it when delegating the Replicating Directory Changes permission earlier). However we cannot just add the new permissions here. If you do they will be applied to the OU only.
The trouble is that this won’t be reported by the SharePoint UI. You will run a sync, but properties won’t be updated in AD, and the SharePoint UI acts as if everything is just fine and dandy. That kick ass dialog we saw before won’t have any errors. The only place to see the error is in the FIM client UI:
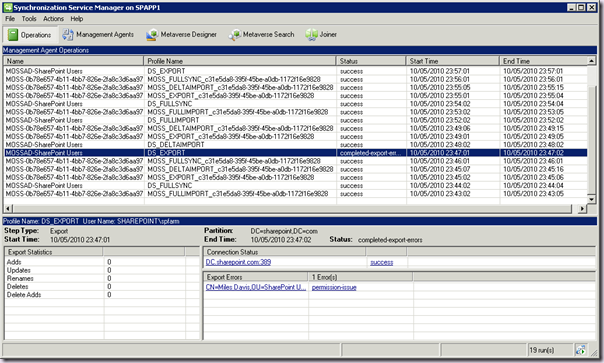
As you can see the DS_EXPORT phase has issues, and if we click the links it tells us the problem is with permissions to the object in AD.
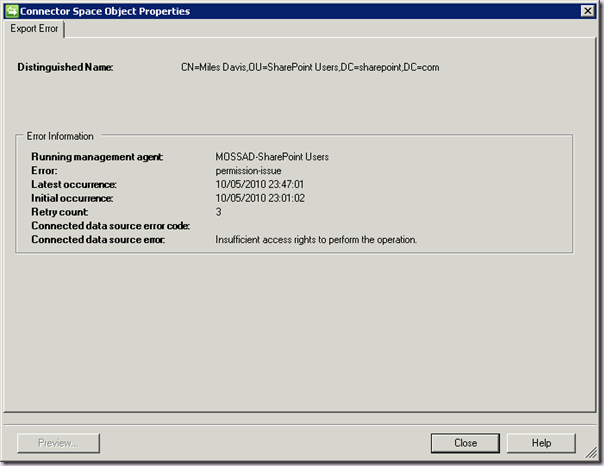
OK great, so back to the DC and the AD permissions. Before you click OK in the permissions dialog above, you need to click the Advanced button, find the second entry for the DOMAIN\spups account in the list – the one without any value in the Inherited From column is the one we are interested in:
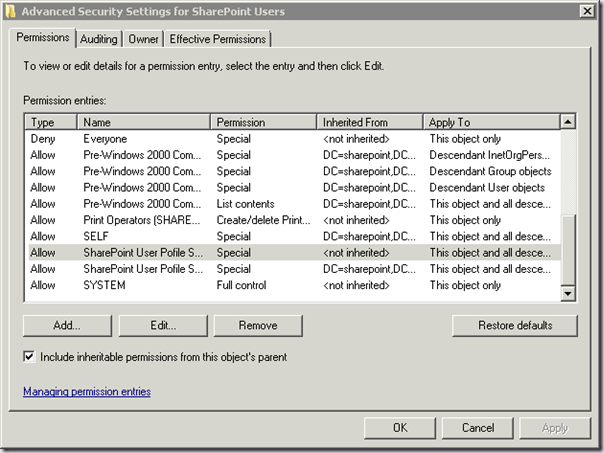
Then click Edit, ensure the Apply To combo box is This object and all dependant objects and add the Write all Properties and Create Child Objects permissions.
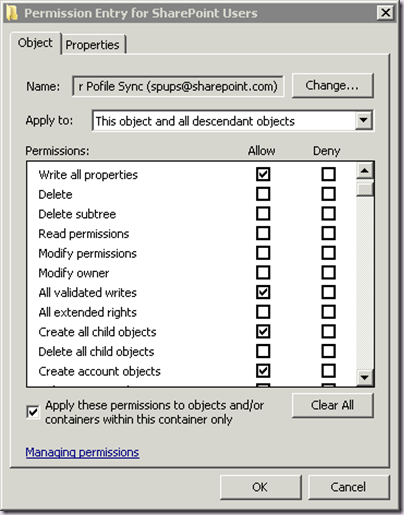
Now click OK however many times you need to clear out all these dialogs and check out a user in the OU. It’s permissions will include the ones we need, and we are good to go…. almost…. :)
In addition, all profile properties are Import by default. This is actually entirely reasonable, just think about all those grumpy domain admins – if SharePoint 2010 came along and wrote back to AD by default that would be a bad thing. It also means you can configure the sync on a granular basis for some properties only.
If you want to write back changes you must remove the existing property mapping and recreate it using Export as the direction. Then those properties will be written back to AD during a Sync.
- From the Manage Profile Service page, in the People section, click Manage User Properties.
- Find the Property you are interested in (I’ll use Work phone in this example) and choose Edit.
- Scroll to the Property Mapping for Synchronization section, and take a note of the Attribute (in this case telephoneNumber). Click Remove.

- In the Add New Mapping section, select telephoneNumber in the attribute drop down and Export in the Direction drop down and click Add.
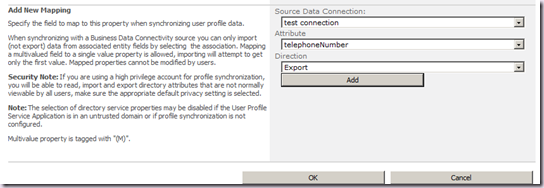
- Click OK to save your changes
Now you can go back to the Manage Profile Service page, Make some changes to a the Work Phone property of one of the users from Manage User Profiles, and kick off another Profile Synchronization. This time the value will be updated in Active Directory.
Wrap Up
Phew! But hey – it works. Stop complaining. :)
Yes it’s a bit “round the houses” but don’t forget you basically have a FIM instance in your farm, and it’s solid and robust once setup. Here are some final tips and tricks for working with UPS in SharePoint 2010, which I will update over time.
- You can read a good portion of Snow Crash by Neal Stephenson whilst FIM is being provisioned. If you are an identity management geek you’ll get the joke.
- Don’t try and work around the Farm Account issue by making the service account another one using Services.msc – it won’t work properly because the UPS related timer jobs are timer jobs and therefore run as the Farm account.
- Don’t forget to remove the Farm Account from local admins on the box running FIM after provisioning.
- Don’t use the same account to run the FIM services and perform the sync. I don’t care what TechNet says, that’s a very bad idea.
- Validate the Active Directory permissions with your admins before proceeding. You can easily spend hours on this and not get anywhere if they are incorrect. Ask for proof (a screenshot) and save yourself the pain.
- Be patient. Calm down! :) shouting at your computer or cursing out the SharePoint team won’t get you done any quicker.
- Managing any service app in central admin is a PITA because the breadcrumb is broken. There is no easy way to get back to Manage Profile Service. Copy the link from Manage Service Applications and create a new link called Manage UPS in the Resources List on the home page of Central Administration.

- If you are having problems, firstly ensure you are following the steps below exactly. I have a follow up article which also details the most common problems with configuring profile synchronization, which may help. “Stuck on Starting”: Common Issues with SharePoint Server 2010 User Profile Synchronization