Print | posted on Saturday, July 28, 2012 7:29 PM
Introduction
SharePoint 2013 Preview introduces a number of new elements and additional considerations for multi tenancy deployments. This article is intended as a companion to my Rational Guide to Multi Tenancy with SharePoint 2010 article series and will cover what’s new and changed in this release with respect to configuration and functionality. It is assumed you are familiar with the material in the article series.
Please note that this article applies to the SharePoint 2013 Preview release. Things are likely to change between now and the final release of SharePoint 2013. I will update this article shortly after RTM.
This article is verified with SharePoint 2013 RTM.
Fundamentally not a great deal has changed. The majority of the configuration, operations and core functionality are the same as with SharePoint 2010. However as SharePoint 2013 introduces changes to existing services along with brand new ones, these services’ degree of multi tenant awareness also changes. We must also factor in the new functionality in the core SharePoint offering as it pertains to a multi tenant deployment.
I have an update to my provisioning scripts to include all the changes and new things in SharePoint 2013 along with a few other refinements, which will be published soon.
New and Changed Service Applications
Three new Service Applications are introduced in SharePoint Server 2013, along with substantial changes to two existing service applications. Here’s a summary of how these changes impact multi tenant deployments.
App Management Service
The App Management Service is the key infrastructure enabler for the new SP Apps platform. App Management allows the configuration of the App Store, Licences, App Purchases, App Catalog, App URLs and App Permissions.
Whilst the App Management Service is not required, as SP Apps are the future of customisation within multi tenant deployments, the App Management Service should be considered a pre-requisite core service, like the Subscription Settings service application. Indeed for the App Management Service Application to function there must be a Subscription Settings service application provisioned.
The App Management Service is inherently Subscription aware and does NOT need to be provisioned in Partitioned Mode (there is no option to do so anyway).
Appropriately most of the Apps configuration “moves” to the Tenant Administration site, allowing each tenant administrator to configure their individual settings from the Marketplace section:

The configuration of App URLs and Monitoring of Apps remains at the Farm scope, and appears exposed via Central Administration. However these pages are useless when in a multi tenancy environment! For some unknown reason Apps get it’s very own top level section in CA. Anyway the configuration of App URLs must be done via Windows PowerShell cmdlets, just like the other main tenant specific settings for MMS, BDC and UPA. This can be done at the time of provisioning or at a later date.
There’s quite some kerfuffle in the developer community about SP Apps since the release of SharePoint 2013 Preview. Ignoring all of the discussion about the new model’s strengths and weaknesses from a customisation perspective, SP Apps are a huge piece of the multi tenancy model in SharePoint 2013 and should not be underplayed. I will probably post more about SP Apps specifically over the coming months.
Translation Service
The Translation Service, also known as the Machine Translation Service, supports multi tenancy by means of its service application being created in Partition Mode. Similar to the Word Automation service application, there is no tenant specific configuration, and the service is managed at the farm level. However just like the Word Automation service, its database is effectively a queue and therefore needs to be partition or tenant aware.
Work Management Service
The Work Management Service does not store any data, and therefore does not need to be created in Partition Mode.
Search Service
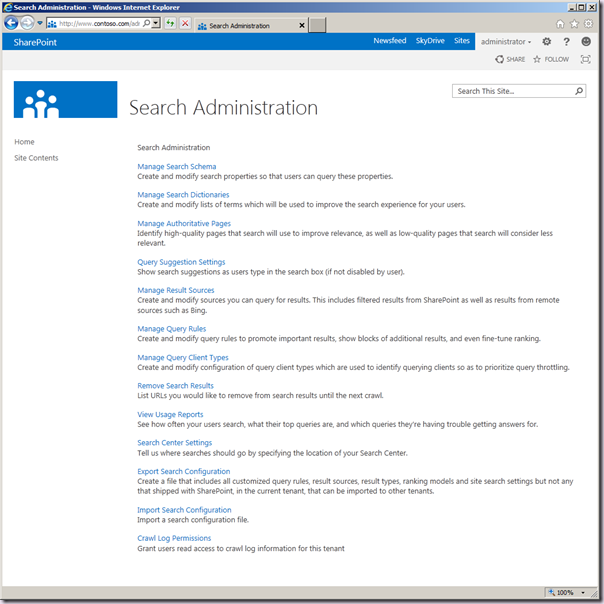
The Search Service in SharePoint 2013 is completely re-architected. The provisioning of the service application and it’s constituent components changes significantly, however from a multi tenancy perspective all we need to do is create the service application in Partition Mode as we did with SharePoint Server 2010. What is brand new and you should like this, is that unlike SharePoint Server 2010 which did not expose any tenant specific configuration, Tenant Administration now provides access to all of the key settings. It’s a beautiful thing!

Many of the *.EnterpriseSearch* Windows PowerShell cmdlets also are partition aware and can be used to automate some of the above configuration. Note the Export and Import Search Configuration options above.
User Profile Service
The User Profile Service hasn’t changed at all with respect to multi tenancy, however it is important to note some of the critical aspects once again. The related bug where a UPA created with a Windows PowerShell session not running as the Farm Account prevents provisioning of the UPS service instance, has NOT been fixed. We still need to use the workaround here. There is also no change to the support of only a single OU per tenant for Synchronization. Furthermore it appears as if Active Directory Import mode does not understand Subscription IDs and therefore cannot be used with a Partition Mode UPA.
All other service applications remain unchanged in terms of their configuration for multi tenancy. Of course where features and functionality have changed (e.g. MMS and BDC) those changes are naturally also available from Tenant Administration. Indeed some of the Search configuration above takes you to the Tenant Manage Term Store page.
Additional Functional Elements
Feature Packs
Feature Packs provide the ability to constrain the Features available for a given tenant. The fundamental capability isn’t changed in any way here, but of course the Features in the product have. Thus the old Feature Pack definitions for SKUs are no longer valid. A new set of feature pack definitions are required encompassing all of the new Features in SharePoint 2013.
Information Rights Management Integration
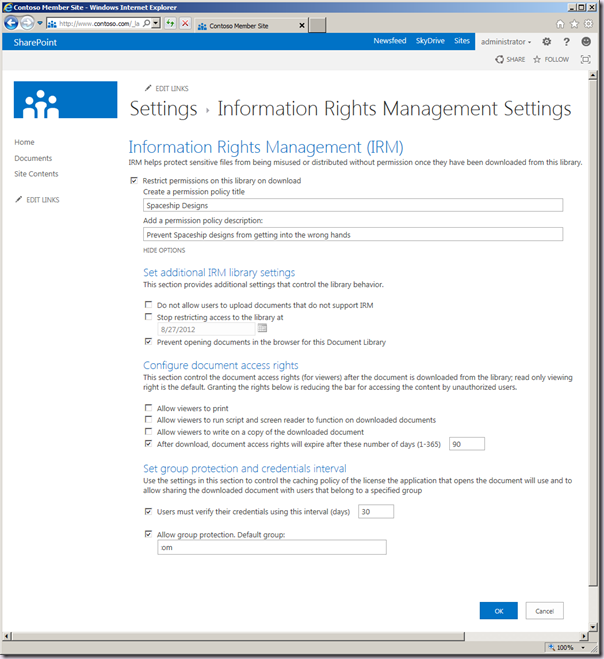
Information Rights Management (IRM) integration can now be configured to be tenant aware, thus providing the ability for each tenant to have different IRM settings. This will be incredibly useful especially in federated IRM scenarios. At the Farm Level we can configure multi tenant support, and we then can add tenant specific settings as part of the tenant provisioning or at a later stage. IRM will then be available to our tenants within Library Settings.

Configuration
The good news here is that the large majority of configuration remains unchanged. With the exception of the creation of the Search service application, all of my previous Windows PowerShell scripts can be used as is, with no modifications. The other changes are simply additions to those scripts.
Configuring the App Management Service
Nothing exciting here, we simply start the service instance and then create the service application and it’s proxy. This is the exact same pattern as used in my previous Windows PowerShell scripts for the other services. We do not need to provide a –PartitionMode parameter.
# App Pools
$saAppPoolName = "SharePoint Web Services Default"

# App Management Specifics
$appsInstanceName = "AppManagementServiceInstance"
$appsName = "App Management Service"
$appsDBName = "ContosoFarm_AppManagement"


# Grab the Appplication Pool for Service Application Endpoint
$saAppPool = Get-SPServiceApplicationPool $saAppPoolName

<# Setup the App Management Service Application & Proxy and start the service instance
    no partition mode, aware of Sub IDs.
#>
Write-Host "Creating $appsName Application and Proxy..."
Get-SPServiceInstance | where{$_.GetType().Name -eq $appsInstanceName} | Start-SPServiceInstance
$appAppSvc = New-SPAppManagementServiceApplication -ApplicationPool $saAppPool -Name $appsName -DatabaseName $appsDBName
$proxyAppSvc = New-SPAppManagementServiceApplicationProxy -ServiceApplication $appAppSvc -Name "$appsName Proxy"

Write-Host "App Management Done!"
Configuring the Translation Service
Again, using the same pattern, we simply start the service instance and then create the service application and proxy. This time we add the –PartitionMode parameter. However, there is an “interesting” aspect to this guy. Creating the service application automatically creates a proxy, but it does not allow you specify a proxy name. It just uses the same name as used for the service application! If you care about consistent naming in your farm (and you should!) you have to delete that proxy and create another one, this time with the name you desire. This continues the trend of wildly inconsistent cmdlet behaviour in SharePoint!
# App Pools
$saAppPoolName = "SharePoint Web Services Default"

# MMS specifics
$tsInstanceName = "Machine Translation Service"
$tsName = "Translation Service Application"
$tsDBName = "ContosoFarm_Translation"

# Grab the Appplication Pool for Service Application Endpoint
$saAppPool = Get-SPServiceApplicationPool $saAppPoolName


<# Sets up Machine Translation service instance & service app and proxy
    Creating service app creates a proxy with the same name as the service app!!
    That auto created proxy will also be in partition mode

    To keep the naming consistent we can delete the autocreated one, and make a new one
#>
Write-Host "Starting the $tsInstanceName..."
Get-SPServiceInstance | ? {$_.GetType().Name -eq $tsInstanceName} | Start-SPServiceInstance

Write-Host "Creating $tsName Application & proxy..."
$ts = New-SPTranslationServiceApplication -PartitionMode -Name $tsName -ApplicationPool $saAppPoolName -DatabaseName $tsDBName
Get-SPServiceApplicationProxy | ? {$_.TypeName -eq "Machine Translation Service Proxy"} | Remove-SPServiceApplicationProxy -Confirm:$false
$proxy = New-SPTranslationServiceApplicationProxy -PartitionMode -Name "$tsName Proxy" -ServiceApplication $ts -DefaultProxyGroup

Write-Host "MTS Done!"
Configuring the Search Service
As the Search service has had a complete overhaul, the old script is no longer valid. The good news is that the Windows PowerShell for working with the Search service and it’s constituent topology elements has been refined. The following script replaces the old version for deploying on a single server farm. Of course we would need to do more work in the topology arena if deploying in a real farm with articulated search roles. The only multi tenancy aspect here is the use of the –Partitioned parameter when creating the service application and proxy.
Add-PSSnapin Microsoft.SharePoint.PowerShell -EA 0


# App Pool
$saAppPoolName = "SharePoint Web Services Default"

# Search Specifics, we are single server farm
$searchServerName = "sp01"
$serviceAppName = "Search Service Application"
$searchDBName = "ContosoFarm_Search"


# Grab the Appplication Pool for Service Application Endpoint
$saAppPool = Get-SPServiceApplicationPool $saAppPoolName

# Start Search Service Instances
Write-Host "Starting Search Service Instances..."
Start-SPEnterpriseSearchServiceInstance $searchServerName
Start-SPEnterpriseSearchQueryAndSiteSettingsServiceInstance $searchServerName

# Create the Search Service Application and Proxy
Write-Host "Creating Search Service Application and Proxy..."
$searchServiceApp = New-SPEnterpriseSearchServiceApplication -Partitioned -Name $serviceAppName -ApplicationPool $saAppPoolName -DatabaseName $searchDBName
$searchProxy = New-SPEnterpriseSearchServiceApplicationProxy -Partitioned -Name "$serviceAppName Proxy" -SearchApplication $searchServiceApp

# Clone the default Topology (which is empty) and create a new one and then activate it
Write-Host "Configuring Search Component Topology..."
$clone = $searchServiceApp.ActiveTopology.Clone()
$searchServiceInstance = Get-SPEnterpriseSearchServiceInstance
New-SPEnterpriseSearchAdminComponent –SearchTopology $clone -SearchServiceInstance $searchServiceInstance
New-SPEnterpriseSearchContentProcessingComponent –SearchTopology $clone -SearchServiceInstance $searchServiceInstance
New-SPEnterpriseSearchAnalyticsProcessingComponent –SearchTopology $clone -SearchServiceInstance $searchServiceInstance
New-SPEnterpriseSearchCrawlComponent –SearchTopology $clone -SearchServiceInstance $searchServiceInstance
New-SPEnterpriseSearchIndexComponent –SearchTopology $clone -SearchServiceInstance $searchServiceInstance
New-SPEnterpriseSearchQueryProcessingComponent –SearchTopology $clone -SearchServiceInstance $searchServiceInstance
$clone.Activate()


Write-Host "Search Done!"
Configuring (or not) Feature Packs
I don’t currently have a set of Feature Pack definitions corresponding to the SKUs of SharePoint 2013. I am not entirely sure I will actually produce them. The use of feature packs to represent SKUs is really only useful from a demonstration perspective, and it’s likely I would make mistakes. I am not the guy to be defining which of the vast number of features included are part of individual SKUs. Obviously if you are running multi tenancy in the real world and are using Feature Packs, you will already have a Feature Pack management toolset, and that will work with no changes for SharePoint 2013 Preview.
Configuring Information Rights Management (IRM)
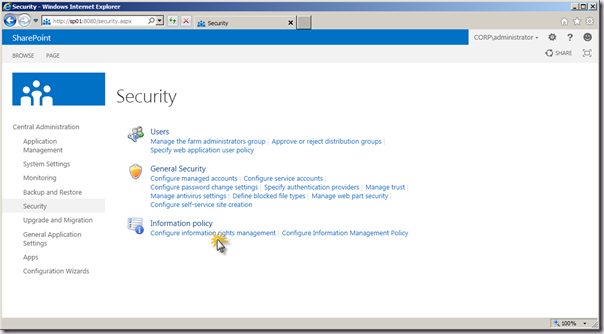
IRM support for multi tenancy can be enabled via Central Administration or the updated Windows PowerShell cmdlets. In Central Administration, simply navigate to the IRM settings page as normal:
Central Administration –> Security –> (Information Policy) Configure information rights management

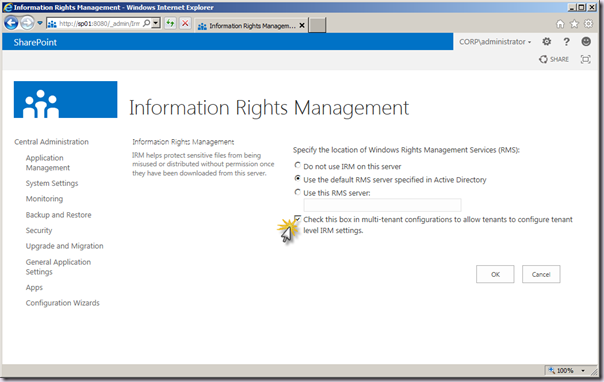
Then select the RMS server as normal and check the Check this box in multi-tenant configurations to allow tenants to configure tenant level IRM settings check box.

In Windows PowerShell we can use the updated Set-SPIRMSettings cmdlet:
Set-SPIRMSettings -IrmEnabled -UseActiveDirectoryDiscovery -SubscriptionScopeSettingsEnabled
There are no configuration options for IRM within Tenant Administration, so this configuration must be applied using the new Windows PowerShell *.SPSiteSubscriptionIRMConfig cmdlets. We could also build this into the tenant provisioning function of my previous scripts.
$sub = Get-SPSiteSubscription "http://www.contoso.com"
Set-SPSiteSubscriptionIRMConfig -Identity $sub -IrmEnabled -CertificateServerUrl "http://rms.corp.cotoso.com"
Conclusion
This article covers a number of new elements and considerations for multi tenancy deployments introduced with SharePoint 2013 Preview along with the necessary changes to the configuration and Windows PowerShell scripts from my Rational Guide to Multi Tenancy with SharePoint 2010 article series. To the cloud, baby!
.