Print | posted on Saturday, July 27, 2013 1:55 AM
Introduction
In the first part of this article we covered the core concepts along with high availability, certificate and SharePoint considerations for Workflow Manager Farms. This is the essential background we need in order to design our deployment. If you are not familiar with this material, read it before continuing with the steps below, as I assume you have read part one!
This part will cover the deployment of a highly available, SSL, Workflow Manager Farm for SharePoint 2013 using auto generated certificates and Network Load Balancing. As discussed in part one, this is the most suitable deployment model for the majority of SharePoint On-premises customers. In addition it is also the easiest way to deploy for production.
Whilst this part is intended as primarily step by step configuration guidance, I will take the opportunity to also explain a few things which didn’t make sense to cover in part one. As such the steps below are not the only order of configuration.
Let’s get our hands dirty with Workflow Manager!
Example Scenario
As usual I have contrived a sample scenario in order to demonstrate the configuration aspects necessary. Clearly such a scenario is not representative of an actual production deployment, and concentrates only on the elements which are important. Basically it’s the least amount of machines necessary to demonstrate the configuration.
I have a single domain, called fabrikam.com. Six members of that domain run Windows Server 2012 and are:
- FABDC1 (10.1.1.50)
DNS, Active Directory Domain Controller - FABSQL1 (10.1.1.60)
A single default instance of SQL Server Database Services - FABWFM1 (10.1.1.70)
Workflow Manager Host - FABWFM2 (10.1.1.71)
Workflow Manager Host - FABWFM3 (10.1.1.72)
Workflow Manager Host - FABSP1 (10.1.1.80)
SharePoint Server 2013
There is also another machine, running Windows 8:
- FABCLIENT1 (10.1.1.90)
Visual Studio 2012, SharePoint Designer 2012, Office 2013 etc.
Obviously the only element which will be fault tolerant or high available is the Workflow Manager farm! I assume that you are familiar with how to deal with high availability for domain services, SQL Server and SharePoint.
The end result we are looking to achieve here of course is a working connection to a load balanced SSL Workflow Manager farm.
Pre-requisite Software
Workflow Manager has very light requirements in terms of pre-requisites. Basically it only needs IIS, .NET 4 PU3 or .NET 4.5. Then the Workflow Manager piece requires Service Bus 1.0, Workflow Client 1.0 and Windows PowerShell 3.0. Workflow Manager itself is installed primarily via the Web Platform Installer (WebPI) which will take care of the pre-requisites as well. There is also an offline installation approach if your machines do not have Internet access.
The upshot here is if you are using a single sysprep (or similar) base image you can use the same one for your Workflow Manager hosts as you do for SharePoint. Another bit of good news is that Workflow Manager’s minimum “hardware” requirement is only 2 cores and 2Gb RAM.
Workflow Client
We will need however to install the Workflow Client 1.0 on every SharePoint server in the farm. Without the Workflow Client we won’t be able to create connections to the Workflow Manager farm, create, initiate or otherwise interact with workflows.
Again the Workflow Client is primarily delivered by the WebPI but can also be installed in “offline” scenarios. What I have done is bake this into my base image. However you should get familiar with performing the offline installation which is common across all products delivered via WebPI.
The trouble is of course, there isn’t a good specific guide to doing this for Workflow Client. The steps are almost accurate but detail Workflow Manager. Also the path in the documented command will not work! It’s just a couple simple changes needed. Since I’ve been asked about this repeatedly, here are the steps:
- On a machine with Internet access, download and install the Web Platform Installer v4 Command Line.
For a while this was Preview, now it’s RTW and it’s right now v4.6. The version changes over time so use the “permalink” above to get the latest and greatest.
- Open a command prompt or Windows PowerShell host under UAC elevation (run it as an administrator)
-
Change to the directory for the Web Platform Installer. By default this is:
cd "c:\Program Files\Microsoft\Web Platform Installer"
- Execute the following command (on a single line):
webpicmd /offline /Products:WorkflowManager
/Path:c:\WorkflowManagerFiles
This will take quite a while - the WebPI will download a manifest of available products and create the folder specified in the Path switch containing the Products specified in the Products switch and any of its dependencies. It’s roughly around a 300 Mb download in total.
Note that I specified WorkflowManager in the Products switch. Because the Client is a dependency for the Manager, this one set of files can be used to perform an offline install of both the Manager and the Client.
- Copy the c:\WorflowManagerFiles folder to the destination server (or zip it up and stick it someplace useful for later)
- On the destination server(s) open a command prompt or Windows PowerShell host under UAC elevation
- Change the directory to the location of the offline installers:
cd "c:\WorkflowManagerFiles\bin"
- To install Workflow Manager execute the following command (on a single line):
WebpiCmd.exe /Install /Products:WorkflowManager
/XML:c:/WorkflowManagerFiles/feeds/latest/webproductlist.xml
- To install Workflow Client execute the following command (on a single line):
WebpiCmd.exe /Install /Products:WorkflowClient
/XML:c:/WorkflowManagerFiles/feeds/latest/webproductlist.xml
Note that all the documentation talks about c:/WorkflowManagerFiles/feeds/shadow-webproductlist.xml.
That path does not exist. Use the path above and you will see the following:

Also, never use Workflow for the Product. That will install a nasty old pre-release build, and we don’t want that.
- Type Y, and hit Return and the installation will proceed.
Network Load Balancing
Our other pre-requisite if of course Network Load Balancing (NLB). We also need to install this on each server in the Workflow Manager farm.
This is a snap to install via Server Manager. Simply select the Windows Server Feature Network Load Balancing. By default this will include NLB and its remote administration Windows PowerShell module and the circa NT4 Option Pack GUI.
Alternatively we can install NLB and its tools with the following Windows PowerShell:
Add-WindowsFeature NLB #nlb
Add-WindowsFeature RSAT-NLB #nlb management UI and PoSh
This is something else I bake into my base sysprep image for application servers.
Creating a Network Load Balancing Cluster for Workflow Manager
We configure a NLB cluster so that we can access Workflow Manager from SharePoint using a virtual name. We need a DNS A record for that virtual name which we will use when creating the NLB Cluster.
On FABDC1 perform the following steps:
- Open DNS Management
- Double click the fabrikam.com Forward Lookup Zone
- From the Action menu, choose New Host (A or AAAA)…
- In the Name text box, enter: wfm
- In the IP Address text box, enter: 10.1.1.100
- Click Add Host
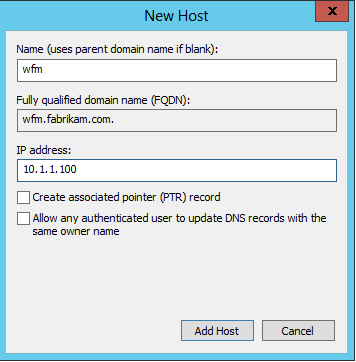
- Click OK, followed by Done.
Alternatively we can create the DNS A record with the following Windows PowerShell:
Import-Module DnsServer
Add-DnsServerResourceRecordA -Name "wfm" -IPv4Address "10.1.1.100" -zone "fabrikam.com"
Now we can proceed and create the NLB Cluster. The Remote Administration Tools for NLB still ship with the NLBMgr.exe tool, a GUI for managing NLB. It works after a fashion, and as much as it makes me feel all comfy with its NT4 Option Pack style and finesse, I really don’t like using it. It often causes more problems than it solves and we can do the same thing much more easily with Windows PowerShell, so I am not going to detail the steps with NLBMgr.exe.
Also depending upon your virtualisation platform, how many network adaptors in your hosts, and how you are connecting to the hosts will determine where to run NLBMgr and what will happen when the NIC is updated with the cluster configuration.
Because I don’t know what type of environment you have, we will configure a Multicast cluster – which while not optimal will work everywhere, even on a Hyper-V machine with a single NIC in each guest. The safest option is to run this script from a machine which is NOT going to be part of the cluster – that will avoid your connection being dropped if you are using Remote Desktop to connect to the hosts. Remember to install the Remote Administration Tools for NLB using Add-WindowsFeature.
Execute the following Windows PowerShell on the machine of your choosing. You will need to update the $interface variable to reflect the name of the NIC you wish to configure for NLB. By default this is “Local Area Connection” but it is a good practice to rename this, especially when hosts have multiple NICs:
Add-WindowsFeature NLB #nlb
Add-WindowsFeature RSAT-NLB #nlb management UI

$interface = "10net"
$initialHost = "FABWFM1"

# Create a new NLB Cluster
New-NLBCluster -Interface $interface -OperationMode Multicast -ClusterPrimaryIP "10.1.1.100" -ClusterName "WFMCluster" -HostName $initialHost

# Remove the stupid default port rule for everything
Get-NlbClusterPortRule -HostName $initialHost | Remove-NlbClusterPortRule -Force

# Add port rules for 12290
Add-NlbClusterPortRule -HostName $initialHost -StartPort 12290 -EndPort 12290 -InterfaceName $interface

# Add other hosts to cluster
Add-NlbClusterNode -HostName $initialHost -InterfaceName $interface -NewNodeName "FABWFM2" -NewNodeInterface $interface
Add-NlbClusterNode -HostName $initialHost -InterfaceName $interface -NewNodeName "FABWFM3" -NewNodeInterface $interface
Creating and Configuring a Workflow Manager Farm
Now we have our base platform taken care of, we can proceed to create and configure the Workflow Manager Farm. There are a few things I like to do as standard for Workflow Manager production installations. These are not “best practices”, just recommendations!
- Use a SQL Alias for the SQL Server.
It’s all very well and good having HA for the Workflow Manager hosts, but we shouldn’t overlook the database platform in this respectJ. I’m using a SQL Alias of SQLWFM in this example.
- Don’t store the Service Bus and Workflow Manager databases on the same SQL Instance that hosts your SharePoint databases.
Don’t collocate this stuff in production, it will only hurt you later. For this example I have a single instance hosting everything.
- Use a dedicated Service Account Identity.
I use the same one for both Workflow Manager and Service Bus. In this example I’m using wfm@fabrikam.com (fabrikam\wfm).
- Everything else I leave at the defaults.
One could change up the database naming convention, but that is only really of help if you are co-locating databases.
We can either use the Workflow Manager Configuration Wizard or Windows PowerShell to create and configure our farm. In reality, the Configuration Wizard simply is a UI which guides us through entering the settings. It then generates Windows PowerShell to actually perform the install and executes it. It also allows us to view and save that Windows PowerShell for later use. Are you paying attention SharePoint? :)
On the first server for the Workflow Manager Farm (FABWFM1):
- Launch the Workflow Manager Configuration Wizard
- Choose the Configure Workflow Manger with Default Settings (Recommended) option
- On the New Farm Configuration page
- Enter SQLWFM as the SQL Instance
- Enter wfm@fabrikam.com as the User ID
- Enter the password as the Password :)
- Enter a Certificate Generation Key twice, and remember it!
- Click the “Next” icon
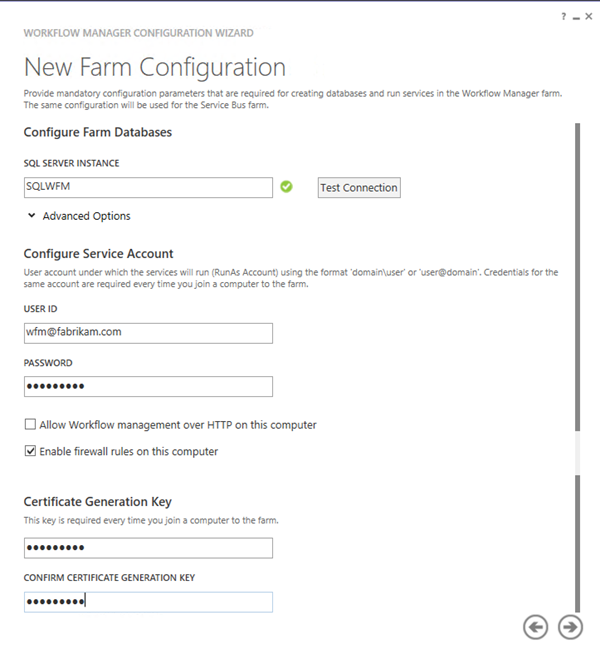
- Wait while the commands to create the farm are generated
- On the Summary page, note the Get PowerShell Commands link. Click the “tick” icon to proceed and apply the configuration
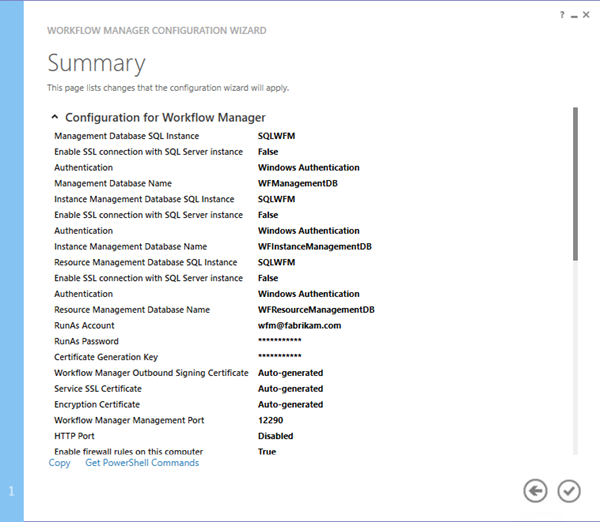
- Wait while the Service Bus Farm and Workflow Manager Farm are created
- Once complete, click the “tick” icon to close the Configuration Wizard
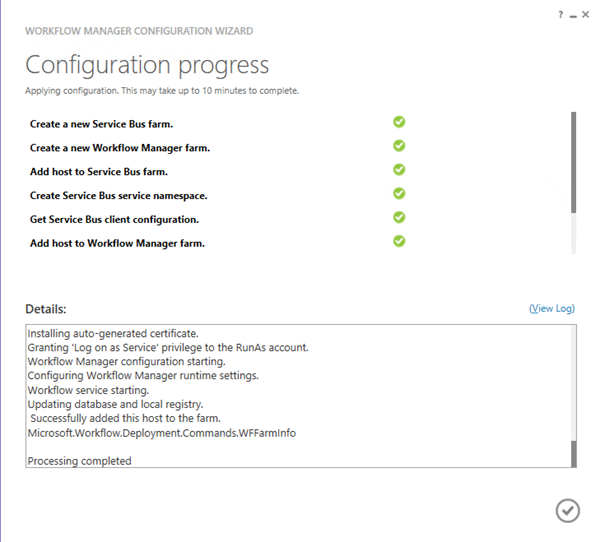
Here’s the Windows PowerShell the wizard generates for me, and I can use when replicating the environment:
# To be run in Workflow Manager PowerShell console that has both Workflow Manager and Service Bus installed.

# Create new SB Farm
$SBCertificateAutoGenerationKey = ConvertTo-SecureString -AsPlainText  -Force  -String '***** Replace with Service Bus Certificate Auto-generation key ******' -Verbose;


New-SBFarm -SBFarmDBConnectionString 'Data Source=SQLWFM;Initial Catalog=SbManagementDB;Integrated Security=True;Encrypt=False' -InternalPortRangeStart 9000 -TcpPort 9354 -MessageBrokerPort 9356 -RunAsAccount 'wfm@fabrikam.com' -AdminGroup 'BUILTIN\Administrators' -GatewayDBConnectionString 'Data Source=SQLWFM;Initial Catalog=SbGatewayDatabase;Integrated Security=True;Encrypt=False' -CertificateAutoGenerationKey $SBCertificateAutoGenerationKey -MessageContainerDBConnectionString 'Data Source=SQLWFM;Initial Catalog=SBMessageContainer01;Integrated Security=True;Encrypt=False' -Verbose;

# To be run in Workflow Manager PowerShell console that has both Workflow Manager and Service Bus installed.

# Create new WF Farm
$WFCertAutoGenerationKey = ConvertTo-SecureString -AsPlainText  -Force  -String '***** Replace with Workflow Manager Certificate Auto-generation key ******' -Verbose;


New-WFFarm -WFFarmDBConnectionString 'Data Source=SQLWFM;Initial Catalog=WFManagementDB;Integrated Security=True;Encrypt=False' -RunAsAccount 'wfm@fabrikam.com' -AdminGroup 'BUILTIN\Administrators' -HttpsPort 12290 -HttpPort 12291 -InstanceDBConnectionString 'Data Source=SQLWFM;Initial Catalog=WFInstanceManagementDB;Integrated Security=True;Encrypt=False' -ResourceDBConnectionString 'Data Source=SQLWFM;Initial Catalog=WFResourceManagementDB;Integrated Security=True;Encrypt=False' -CertificateAutoGenerationKey $WFCertAutoGenerationKey -Verbose;

# Add SB Host
$SBRunAsPassword = ConvertTo-SecureString -AsPlainText  -Force  -String '***** Replace with RunAs Password for Service Bus ******' -Verbose;


Add-SBHost -SBFarmDBConnectionString 'Data Source=SQLWFM;Initial Catalog=SbManagementDB;Integrated Security=True;Encrypt=False' -RunAsPassword $SBRunAsPassword -EnableFirewallRules $true -CertificateAutoGenerationKey $SBCertificateAutoGenerationKey -Verbose;

Try
{
    # Create new SB Namespace
    New-SBNamespace -Name 'WorkflowDefaultNamespace' -AddressingScheme 'Path' -ManageUsers 'wfm@fabrikam.com','Administrator@FABRIKAM' -Verbose;

    Start-Sleep -s 90
}
Catch [system.InvalidOperationException]
{
}

# Get SB Client Configuration
$SBClientConfiguration = Get-SBClientConfiguration -Namespaces 'WorkflowDefaultNamespace' -Verbose;

# Add WF Host
$WFRunAsPassword = ConvertTo-SecureString -AsPlainText  -Force  -String '***** Replace with RunAs Password for Workflow Manager ******' -Verbose;


Add-WFHost -WFFarmDBConnectionString 'Data Source=SQLWFM;Initial Catalog=WFManagementDB;Integrated Security=True;Encrypt=False' -RunAsPassword $WFRunAsPassword -EnableFirewallRules $true -SBClientConfiguration $SBClientConfiguration -CertificateAutoGenerationKey $WFCertAutoGenerationKey -Verbose;
Now we go ahead and run the Workflow Manager Configuration Wizard on the second and third servers in the farm (FABWFM2 and FABWFM3).
- Launch the Workflow Manager Configuration Wizard
- Choose the Join an Existing Workflow Manager Farm option
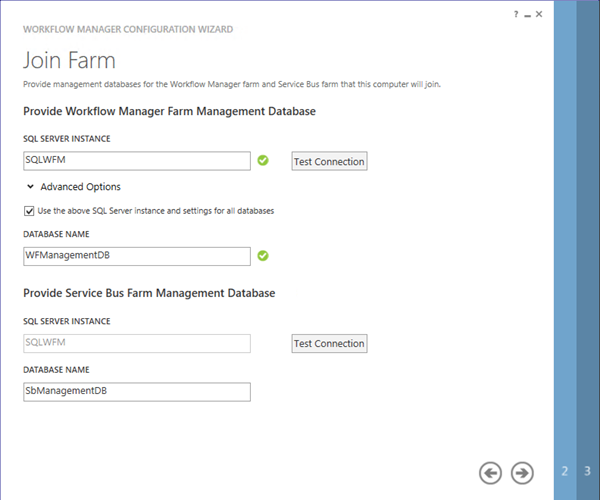
- On the Join Farm page
- Enter SQLWFM as the SQL Instance
- Hit the Test Connection button
- Click the “Next” icon
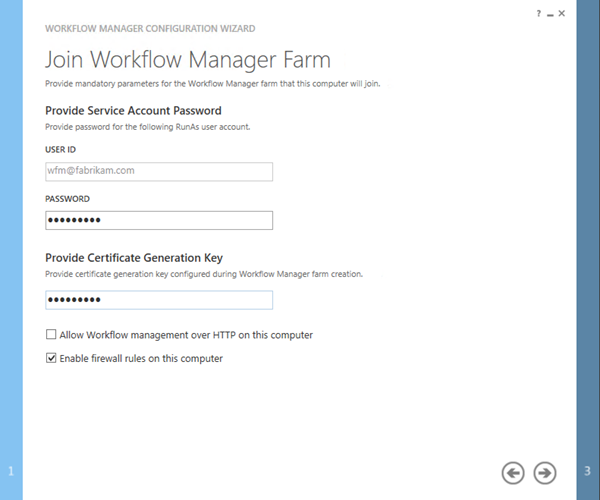
- On the Join Workflow Manager Farm page
- Enter the Password for the Service Account
- Enter the Certificate Generation Key you used on FABWFM1
- Click the “Next” icon
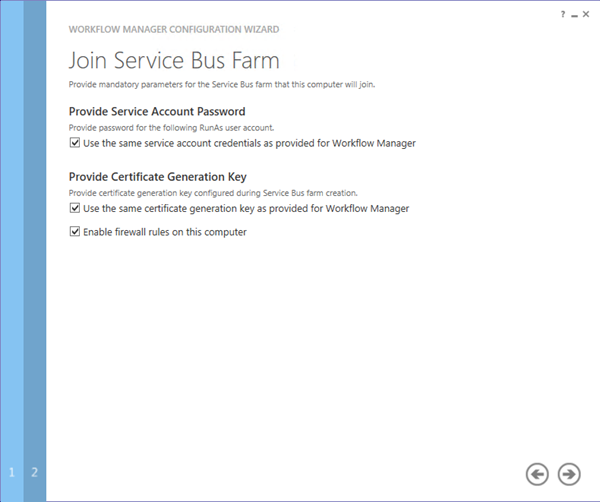
- On the Join Service Bus Farm page
- Check the Use the same service account credentials as provided for Workflow Manager check box
- Enter the same Certificate Generation Key as used when creating the farm
- Click the “Next” icon
- Wait while the command to create the farm are generated
- On the Summary page, note the same Get PowerShell Commands link. Click the “tick” icon to proceed and apply the configuration
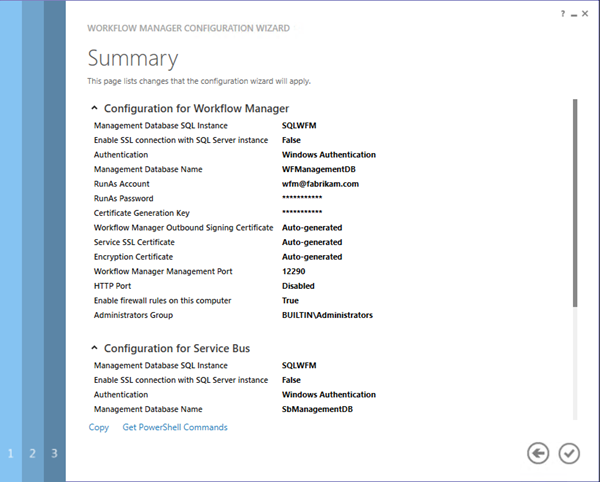
- Wait while the host is added to the Service Bus Farm and Workflow Manager Farm
- Once complete, click the “tick” icon to close the Configuration Wizard
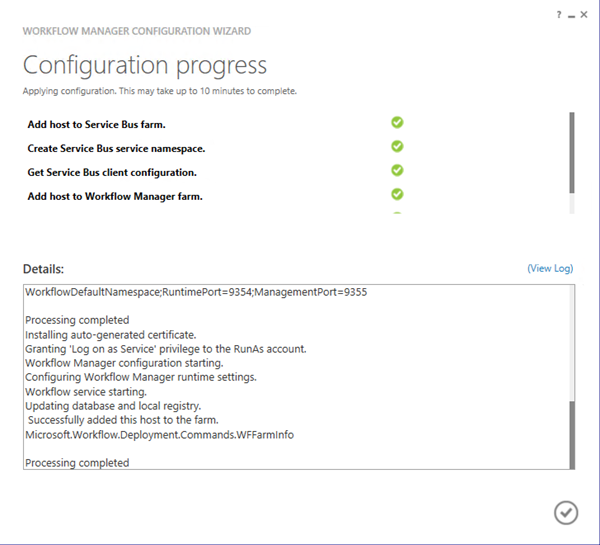
Here’s the Windows PowerShell the wizard generates for me, and I can use when replicating the environment:
# To be run in Workflow Manager PowerShell console that has both Workflow Manager and Service Bus installed.

# Add SB Host
$SBRunAsPassword = ConvertTo-SecureString -AsPlainText  -Force  -String '***** Replace with RunAs Password for Service Bus ******' -Verbose;


$SBCertificateAutoGenerationKey = ConvertTo-SecureString -AsPlainText  -Force  -String '***** Replace with Service Bus Certificate Auto-generation key ******' -Verbose;


Add-SBHost -SBFarmDBConnectionString 'Data Source=SQLWFM;Initial Catalog=SbManagementDB;Integrated Security=True;Encrypt=False' -RunAsPassword $SBRunAsPassword -EnableFirewallRules $true -CertificateAutoGenerationKey $SBCertificateAutoGenerationKey -Verbose;

Try
{
    # Create new SB Namespace
    New-SBNamespace -Name 'WorkflowDefaultNamespace' -AddressingScheme 'Path' -ManageUsers 'wfm@fabrikam.com','Administrator@FABRIKAM' -Verbose;

    Start-Sleep -s 90
}
Catch [system.InvalidOperationException]
{
}

# Get SB Client Configuration
$SBClientConfiguration = Get-SBClientConfiguration -Namespaces 'WorkflowDefaultNamespace' -Verbose;

# Add WF Host
$WFRunAsPassword = ConvertTo-SecureString -AsPlainText  -Force  -String '***** Replace with RunAs Password for Workflow Manager ******' -Verbose;


$WFCertAutoGenerationKey = ConvertTo-SecureString -AsPlainText  -Force  -String '***** Replace with Workflow Manager Certificate Auto-generation key ******' -Verbose;


Add-WFHost -WFFarmDBConnectionString 'Data Source=SQLWFM;Initial Catalog=WFManagementDB;Integrated Security=True;Encrypt=False' -RunAsPassword $WFRunAsPassword -EnableFirewallRules $true -SBClientConfiguration $SBClientConfiguration -CertificateAutoGenerationKey $WFCertAutoGenerationKey -Verbose;
Easy Peasy Lemon Squeezy. We can view the status of our Workflow Manager by running the Following Windows PowerShell on one of the hosts:
Import-Module WorkflowManager
Get-WFFarm
Get-WFFarmStatus
Which will give us the following output:
FarmType                   : Workflow
WFFarmDBConnectionString   : Data Source=SQLWFM;Initial Catalog=WFManagementDB;Integrated Security=True;Encrypt=False
RunAsAccount               : wfm@fabrikam.com
AdminGroup                 : BUILTIN\Administrators
Hosts                      : {Name: FABWFM1.fabrikam.com, Configuration State: HostConfigurationCompleted, Name: FABWFM2.fabrikam.com, Configuration State: HostConfigurationCompleted,
                             Name: FABWFM3.fabrikam.com, Configuration State: HostConfigurationCompleted}
InstanceDBConnectionString : Data Source=SQLWFM;Initial Catalog=WFInstanceManagementDB;Integrated Security=True;Asynchronous Processing=True;Encrypt=False
ResourceDBConnectionString : Data Source=SQLWFM;Initial Catalog=WFResourceManagementDB;Integrated Security=True;Asynchronous Processing=True;Encrypt=False
HttpPort                   : 12291
HttpsPort                  : 12290
OutboundCertificate        : Thumbprint: 53C96B64BAFC637A885F4BB4D0CB6ECB0F593680, IsGenerated: True
Endpoints                  : {https://FABWFM1.fabrikam.com:12290/, https://FABWFM2.fabrikam.com:12290/, https://FABWFM3.fabrikam.com:12290/}
SslCertificate             : Thumbprint: 029D8DBD758DDE27AAD75D4B8C0816439EA1665D, IsGenerated: True
EncryptionCertificate      : Thumbprint: 029D8DBD758DDE27AAD75D4B8C0816439EA1665D, IsGenerated: True

HostName      : FABWFM1.fabrikam.com
ServiceName   : WorkflowServiceBackend
ServiceStatus : Running

HostName      : FABWFM1.fabrikam.com
ServiceName   : WorkflowServiceFrontEnd
ServiceStatus : Running

HostName      : FABWFM2.fabrikam.com
ServiceName   : WorkflowServiceBackend
ServiceStatus : Running

HostName      : FABWFM2.fabrikam.com
ServiceName   : WorkflowServiceFrontEnd
ServiceStatus : Running

HostName      : FABWFM3.fabrikam.com
ServiceName   : WorkflowServiceBackend
ServiceStatus : Running

HostName      : FABWFM3.fabrikam.com
ServiceName   : WorkflowServiceFrontEnd
ServiceStatus : Running
At this stage it is prudent to test the Workflow Manager Farm is responding on its virtual name from a machine which is not part of the farm. This also allows us to easily access the certificate we will need in the next stage.
Perform the following steps on FABSP1:
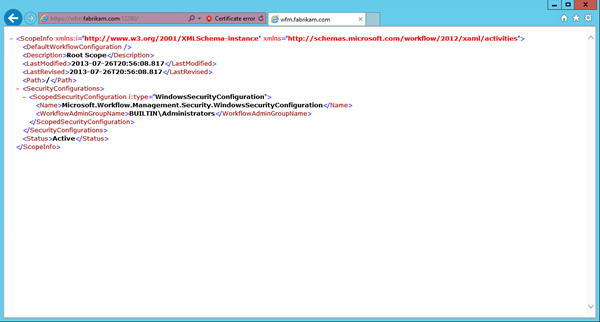
- Using Internet Explorer, browse to https://wfm.fabrikam.com:12290.
- We will see a certificate warning – as the certificate is untrusted.
- Click Continue to this website (not recommended) and we will see the Workflow Manager configuration returned:
- Click the Certificate Error icon to the right of the Address Bar
- Click View Certificates
- Click the Details tab
- Click the Copy to File… button
- On the Welcome to the Certificate Export Wizard page, click Next
- On the Export File Format page, click Next
- In the File name text box enter c:\wfm.cer and click Next
- Click Finish, followed by OK twice
Create a Workflow Service Connection in SharePoint
Now we have a functional Workflow Manager farm, load balanced we can use its virtual name to create the Service Connection in SharePoint.
These tasks assume that your SharePoint Farm is up and ready. We also need a SSL Web Application listening on https://intranet.fabrikam.com.
Perform the following tasks on FABSP1:
- Import the Workflow Manager SSL Services Certificate to the SharePoint Certificate Store. Execute the following Windows PowerShell:
$trustCert = Get-PfxCertificate "c:\wfm.cer"
New-SPTrustedRootAuthority -Name "Workflow Manager Farm" -Certificate $trustCert
Watch out with this cmdlet. If the certificate file doesn’t exist it will still create a trust! Way to go SharePoint! Make sure to watch the output for any errors. If there are some, you will need to delete the trust before running New-SPTrustedRootAuthority again after resolving the problem.
- Register the Workflow Service connection with SharePoint by executing the following Windows PowerShell:
Register-SPWorkflowService -SPSite "https://intranet.fabrikam.com" -WorkflowHostUri "https://wfm.fabrikam.com:12290"
Again watch out with this cmdlet. Notice a trend here? If this command fails the Service Application Proxy will still be created but it will be effectively broken. Again monitor the output for any errors. Clean up the connection and re-run Register-SPWorkflowService after resolving the problem.
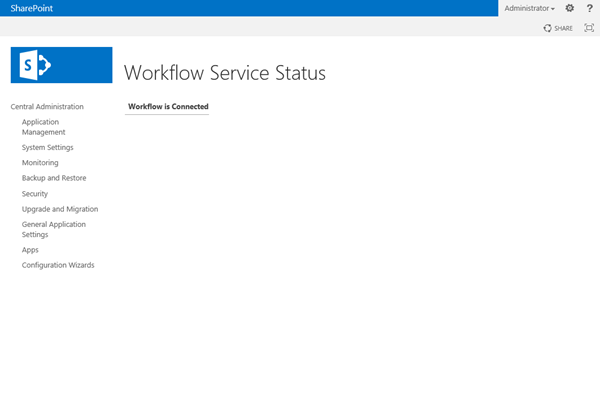
- We can open up Central Administration and click the Workflow Service Application Proxy in Manage Service Applications to view the Workflow Service Status Page:
If there is a problem, in some cases we will see a different display:
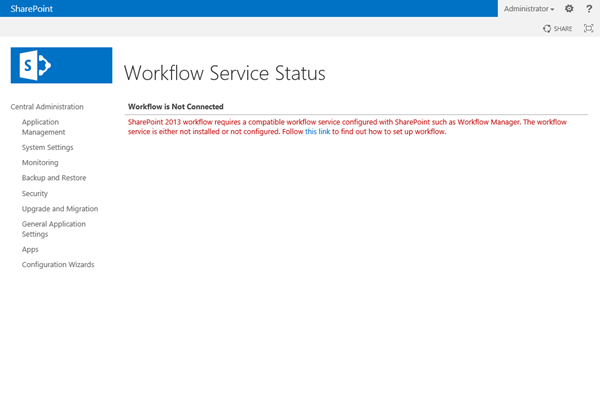
But be wary, this will not always be the case. It’s entirely possible to have a broken Workflow connection, and this page display a connection.
The only real way to test properly is to crack open SharePoint Designer and attempt to create a SharePoint 2013 Workflow and then actually execute it.
On FABCLIENT1 perform the following steps:
- Launch SharePoint Designer and open https://intranet.fabrikam.com, wait whilst WebDAV gets it act together.
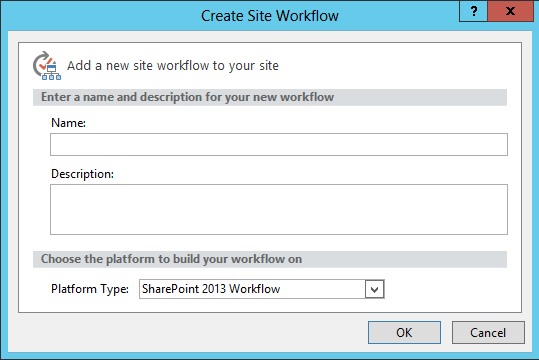
- Click the Site Workflow button on the ribbon
- Ensure that SharePoint 2013 Workflow is available in the Platform Type combo box:
If you are feeling pointy and clicky you can go ahead and configure and execute a Workflow. For the purposes of this article we will leave it here. Trust me, it works! :)
Conclusion
Pretty simple. We sort out our base infrastructure, create a NLB Cluster, create a Workflow Manager farm, and create a connection between SharePoint and Workflow Manager. All using pretty much default settings and auto generated certificates. The third part will cover switching to use Domain Certificates.
Until then, happy workflowing!